Team Members
The Team Members page is where you manage everyone who uses Supportomation. Each team member has a support role, capability flags that determine what work they can be assigned, and client group access that controls which tickets they can see.
Role Access Admin only. Admins can add, edit, deactivate, and archive team members. Lead and Member can view the team list but cannot make changes.
Getting There
- Click Team in the sidebar
- The Members tab is selected by default
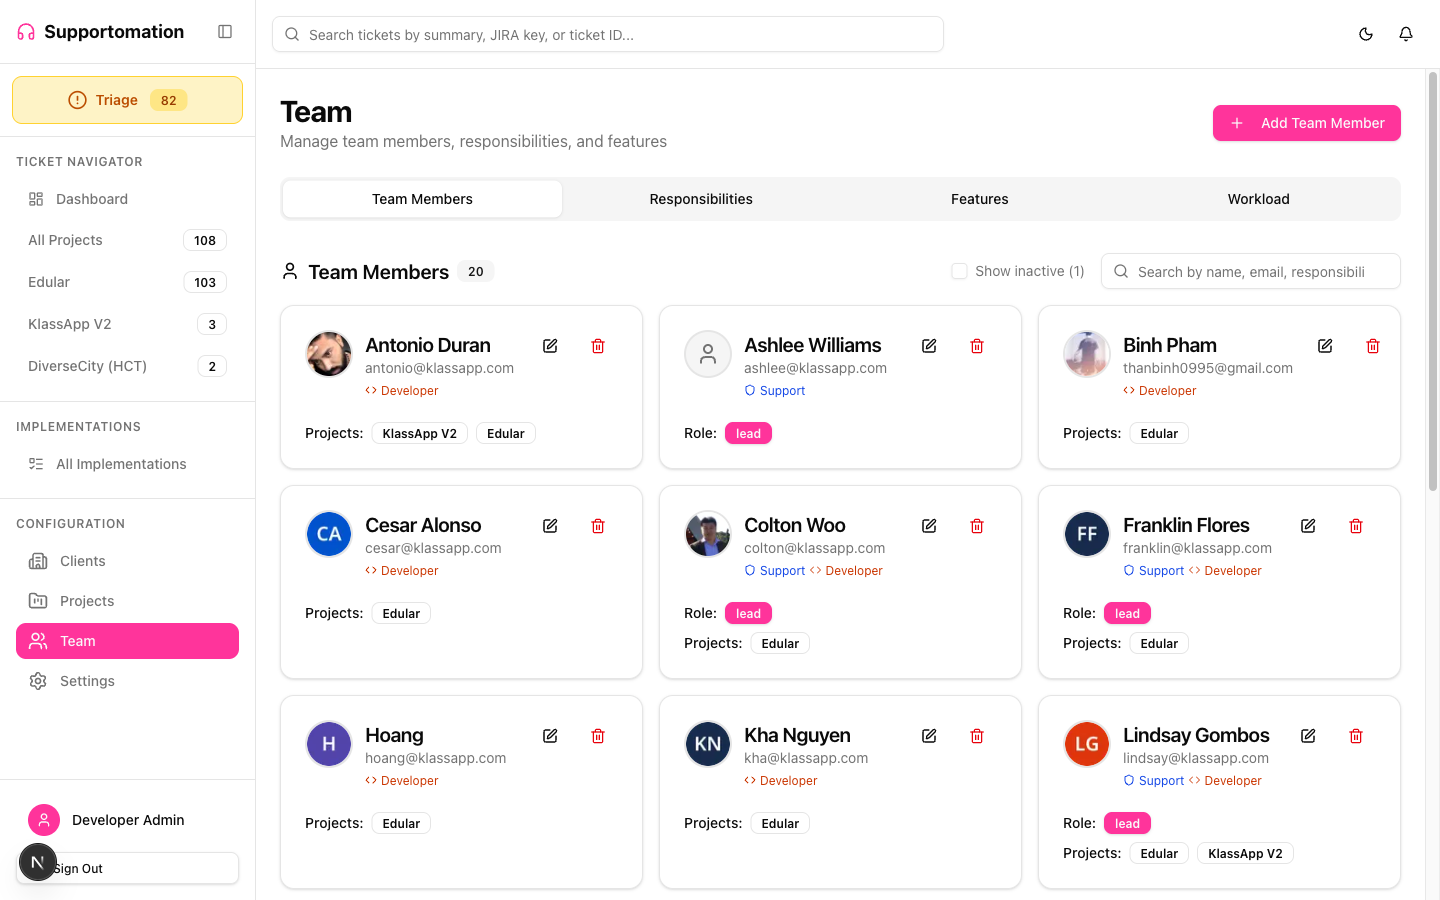
Team Member List
The Members tab shows all active team members in a table. Each row displays:
| Column | Description |
|---|---|
| Name | Full name of the team member |
| Login email address | |
| Role | Support role: Admin, Lead, or Member |
| Capabilities | Icons or badges indicating Can Support, Can Develop, or both |
| Status | Active or Inactive |
Archived members are hidden from this list entirely. Use the filter or toggle to reveal them if needed.
Adding a Team Member
- Click the Add Member button at the top of the Members tab
- Fill in the required fields: name and email
- Set the Support Role (Admin, Lead, or Member)
- Enable at least one capability flag (see below)
- Assign the member to one or more Client Groups to control ticket visibility
- Click Save
The new team member will receive an invitation to set up their account.
Capability Flags
Every team member must have at least one capability enabled:
| Flag | What It Does |
|---|---|
| Can Support | The member can be assigned as the support contact on tickets. Required for claiming tickets and responding to clients. |
| Can Develop | The member can be assigned as the developer on Development tickets. Requires a JIRA Account ID for JIRA integration. |
Members with both flags enabled can be assigned to either role on a ticket. When editing a team member, you can toggle these flags at any time.
Support Roles
Each team member is assigned exactly one support role that determines their permissions across the system:
| Role | Access Level |
|---|---|
| Admin | Full system access including settings, team management, and all ticket operations |
| Lead | Day-to-day ticket management, client responses, JIRA operations, and implementations |
| Member | Read-only access to tickets and views |
For a full breakdown of what each role can do, see Roles & Permissions.
JIRA Account ID
Team members with the Can Develop capability should have their JIRA Account ID configured. This ID links the Supportomation member to their JIRA user account so that:
- JIRA tickets can be assigned to them automatically
- Assignee changes in JIRA sync back to Supportomation
- Their JIRA workload is visible in the Workload tab
You can find a member’s JIRA Account ID in JIRA’s user management settings or by inspecting their JIRA profile URL.
Client Group Access
Each team member is assigned to one or more Client Groups. These groups control which clients’ tickets the member can see throughout the system, including the ticket list, dashboard, and triage view.
- Assign the All Clients system group to give a member visibility into every client
- Create custom groups for teams that only handle specific clients
Client group assignments are configured in the team member edit form. For more details on how groups work, see Client Groups.
Active / Inactive Toggle
Deactivating a team member removes them from assignment dropdowns and stops notifications without deleting their data:
- Active: The member appears in all lists and can be assigned to tickets
- Inactive: The member is hidden from assignment dropdowns and does not receive notifications, but their historical ticket assignments remain intact
To toggle a member’s status, open their edit form and change the Active switch. Inactive members still appear in the Members list with a visual indicator showing their status.
Archiving
Archiving goes a step further than deactivating. An archived member is completely hidden from the UI:
- They do not appear in the Members list, assignment dropdowns, or workload views
- Their historical data (ticket assignments, activity logs) is preserved in the database
- Archiving is reversible — an Admin can unarchive a member to restore their visibility
Use archiving for team members who have left the organization or will not return. Use the inactive toggle for temporary absences.
Notification Preferences
Each team member can configure how they receive notifications. These preferences are set per member and control both email and Discord alerts:
| Preference | Description |
|---|---|
| Email notifications | Toggle email alerts for ticket assignments, client replies, completions, reopened tickets, and weekly summaries |
| Discord notifications | Toggle Discord alerts for the same event types |
| Weekly summary | Opt in to receive a Monday morning summary email with assigned tickets, overdue items, and JIRA status |
Notification preferences are configured in the team member edit form.
Preferred Locale
Each team member can set their preferred language. This setting controls:
- The language of the Supportomation interface
- Date and time formatting
- Spellcheck language in the rich text editor
Supported locales: English (en), Spanish-Mexico (es-MX), Hindi (hi), Ukrainian (uk), and Vietnamese (vi).
Tips & Troubleshooting
| Issue | Solution |
|---|---|
| Cannot add a new team member | Only Admins can manage team members. Check your role on the Roles & Permissions page. |
| Team member cannot see any tickets | They may not be assigned to a Client Group. Edit the member and add them to at least one group, or add them to the “All Clients” group. |
| JIRA tickets not assigning to a developer | Ensure the developer’s JIRA Account ID is configured and matches their JIRA profile. The Can Develop flag must also be enabled. |
| Deactivated member still appears in lists | Deactivated members remain visible in the Members list but are removed from assignment dropdowns. To hide them completely, use Archive. |
| Archived member needs to return | An Admin can unarchive the member from the team management interface to restore their visibility and access. |
| Notifications not arriving | Check the member’s Notification Preferences to ensure the relevant channels (email, Discord) are enabled for the event type. |
Next Steps
- Roles & Permissions — Detailed breakdown of what each role can do
- Responsibilities — Define technical domains for ticket classification
- Features — Define functional areas for ticket classification
- Workload — View ticket distribution across the team
- Client Groups — Control which clients a team member can access