Ticket Detail
The Ticket Detail page is where you view the full context of a support ticket and take action on it. This is the primary workspace for responding to clients, managing assignments, and coordinating with JIRA.
Role Access Admin and Lead can edit, assign, and respond. Member has read-only access.
Getting There
- Click any ticket card from the Tickets list
- Click a ticket link from the Dashboard pending actions
- Click a notification in the Notification Bell
- Direct URL:
/tickets/{ticketId}
The Back button preserves your previous filters and tab position.
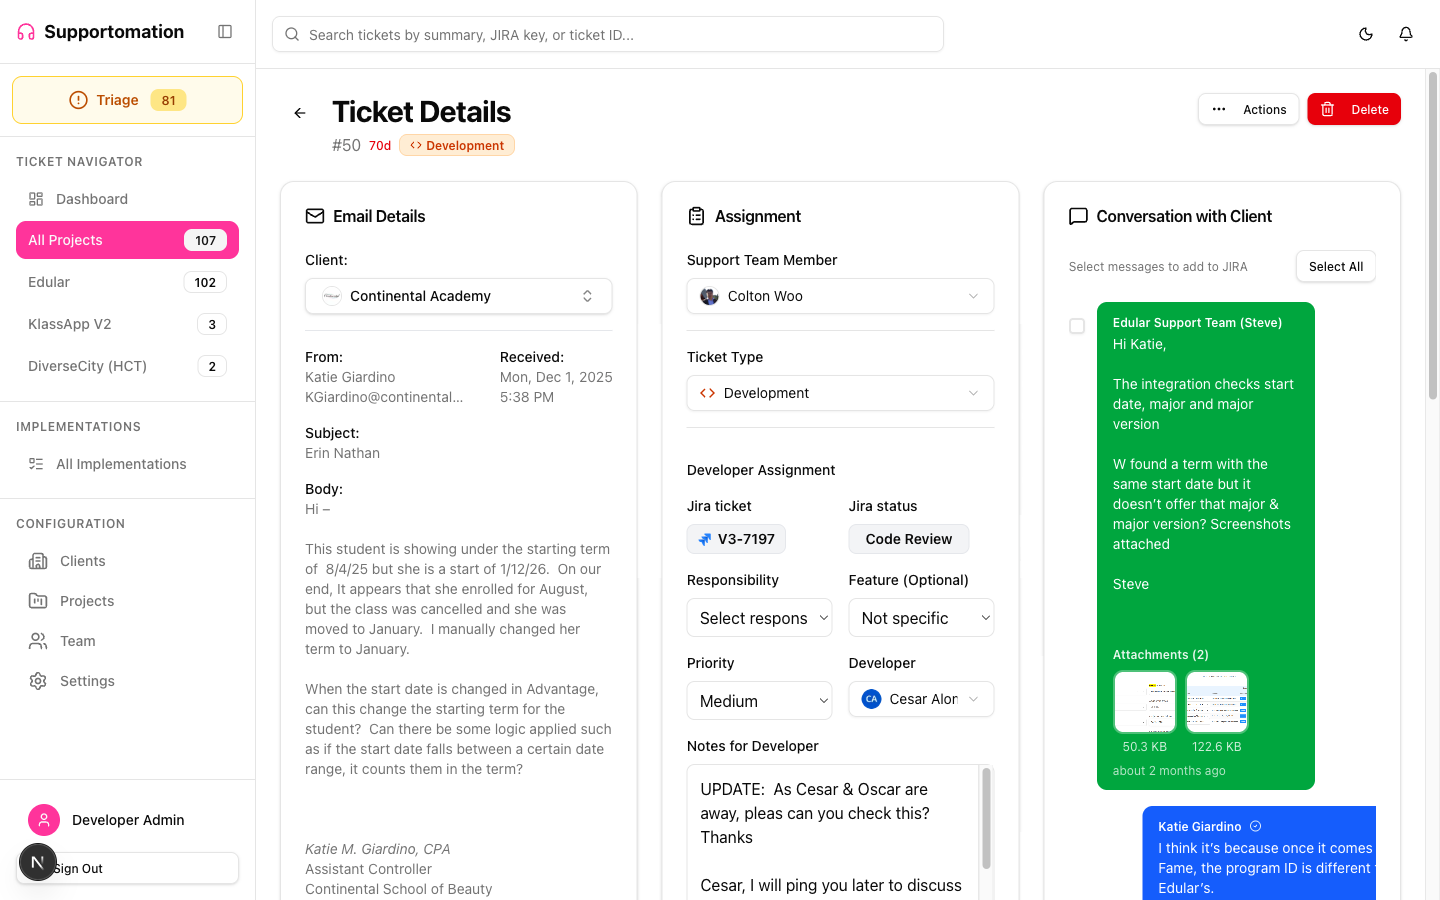
Screen Layout
The page is divided into three main sections:
- Header — Client info, ticket number, type badge, and action menu
- Left Panel — AI analysis, original email, conversation thread, and reply composer
- Right Panel — Assignment controls, JIRA integration, and notes
Header
At the top of the page you’ll see:
- Client name and logo (or “Internal” / “Unknown” for internal/triage tickets)
- Ticket number (e.g.,
#42) — click to copy - Type badge: Blue for Activity, Orange for Development
- Special badges when applicable: Internal, Spam, Forwarded, Split
- Overdue indicator if the ticket has exceeded the aged threshold
Actions Menu
Click the three-dot menu in the header to access:
| Action | Description | Available To |
|---|---|---|
| Edit Ticket | Edit subject and details | Admin, Lead |
| Split Ticket | Create a new ticket from part of this conversation | Admin, Lead |
| Change Type | Switch between Activity and Development | Admin, Lead |
| Mark as Reviewed | Clear the “pending action” flag | Admin, Lead |
| Mark as Spam | Flag as spam (optionally delete JIRA ticket) | Admin, Lead |
| Reopen Ticket | Reopen a completed/resolved ticket | Admin, Lead |
| Delete Ticket | Permanently delete (optionally delete JIRA) | Admin |
AI Analysis
An expandable section shows how the AI classified this ticket:
- Confidence Score — Percentage with color coding:
- Green (90%+): High confidence, auto-assigned
- Yellow (70-89%): Medium confidence, flagged for review
- Red (below 70%): Low confidence, requires human decision
- Issue Type — What the AI detected (bug, feature request, question, etc.)
- Summary — AI-generated one-line summary
- Detailed Reasoning — Expandable explanation of why the AI made this classification
Click Show/Hide AI Analysis to toggle this section.
Original Email
Below the AI analysis, you can expand the Original Email section to see the raw email that created this ticket. This includes:
- Full email body with formatting preserved
- Any attachments from the original email (images, PDFs, documents)
- Click attachments to view or download
Assignment Panel
(Admin and Lead only — Members see a read-only summary)
The right side panel controls who handles this ticket:
Client Assignment
- Client dropdown — Assign or change the client
- Useful for Triage tickets where the client isn’t yet known
- Changing the client moves the ticket to that client’s project
Support Member
- Combobox with search — Assign a support team member
- Shows avatar and name
- Type to filter the list
- Only shows active team members
Developer (Development tickets only)
- Combobox with search — Assign a developer
- Filtered to team members with the “Can Develop” capability
Classification
- Responsibility — Select the technical domain (e.g., Web Frontend, Backend API)
- Feature — Select the functional area (e.g., Chat, Calendar)
- Priority — Set from Lowest to Urgent (5 levels)
Assignment Notes
- Rich text editor for internal notes about this ticket
- Supports formatting, links, and images (paste from clipboard)
- Attach files to notes using the upload button
- Notes are visible only to team members, never sent to clients
Save Actions
- Update Assignment — Save all assignment changes
- Assign & Create JIRA (Development tickets) — Save and create a linked JIRA ticket
Conversation Thread
The main area shows the full conversation history:
- Client messages appear on one side with the client’s identity
- Support responses appear on the other side
- Each message shows the sender name, timestamp, and any attachments
- Long messages have an Expand/Collapse toggle
Selecting Messages for JIRA
Each message has a checkbox. Select messages and click “Add Selected to JIRA” to append them as comments on the linked JIRA ticket. Messages already added show an “Added to JIRA” indicator.
Replying to Clients
(Admin and Lead only)
Below the conversation thread:
- Type your response in the rich text editor
- Use the toolbar for formatting (bold, italic, lists, links)
- Paste images directly from your clipboard
- Attach files using the upload button (images, PDFs, documents, videos up to 50MB)
- Click Send Reply to send the email to the client
Replies are sent as real emails to the client. Double-check your message before sending.
JIRA Integration
(Development tickets only)
When a ticket has a linked JIRA issue, you’ll see:
- JIRA Key (e.g.,
PROJ-123) — Click to open in JIRA - Status — Color-coded badge matching JIRA status
- Assignee — The JIRA assignee (synced from JIRA via webhook)
- Tracking — Active or Inactive toggle for resolution email automation
Actions
- Link Existing JIRA — Search and link to an existing JIRA issue instead of creating a new one
- Sync from JIRA — Refresh status, assignee, and details from JIRA
- Add Messages to JIRA — Select conversation messages to add as JIRA comments
Progress Tracking
Use the segmented buttons to update the ticket’s progress:
- To Do (gray) → In Progress (blue) → Done (green)
This progress is tracked within Supportomation and is separate from the JIRA status.
Resolution
When a ticket reaches a completed status:
Automatic Mode
If your system is configured for automatic resolution emails, the client receives a notification automatically when JIRA marks the issue as resolved.
Manual Mode
An Admin or Lead can:
- Click Send Resolution Email
- Customize the message in the editor
- Send to the client
Alternatively, click Mark Resolved Without Email to close the ticket silently.
Splitting a Ticket
If a client’s email contains multiple issues:
- Open the Actions Menu → Split Ticket
- A modal shows the original email content
- Edit the summary for the new ticket
- Click Create Split Ticket
The new ticket will reference the original via a “Split from #xxx” link.
Tips & Troubleshooting
| Issue | Solution |
|---|---|
| Can’t see assignment panel | You may have Member role — check with your admin |
| JIRA section not showing | Ticket must be Development type with JIRA configured for the project |
| Reply button disabled | Check that the client has an email address on file |
| Attachments not loading | Check your storage configuration in Settings |
| Overdue indicator showing | The ticket has exceeded the aged threshold set in Triage Settings |
Next Steps
- Ticket List & Filtering — Finding and browsing tickets
- Ticket Types — Understanding Activity vs Development
- JIRA Integration — Detailed JIRA workflow guide
- Triage — Handling unassigned and unknown tickets